Configuring Azure Private Link for Azure Virtual Desktop
1. What is Azure Private Link?
You can use Azure Private Link to securely connect your session hosts with Azure Virtual Desktop. By setting up a private endpoint, your data stays within Microsoft’s network and doesn’t travel over the public internet, which boosts security. To access the session hosts, you use the RDClient on your physical device. When Azure Private Link is enabled, your physical device should also be on the private network, which may require a Site-to-Site connection or ExpressRoute from On-Premises to Azure Cloud. This article explains how Private Link can secure your Azure Virtual Desktop environment.
Session Hosts-Session Hosts are virtual machines that provide the desktop and application experience for users in Azure Virtual Desktop.
Private Endpoint-Private Endpoint is a secure connection that allows you to access Azure services (AVD, Storage Account) over a private network, keeping your data traffic within Microsoft's network rather than the public internet.
RDClient-Azure Virtual Desktop Remote Desktop Client, is a software application that allows users to connect to and interact with their virtual desktops and applications hosted in Azure Virtual Desktop.
Physical Device- A physical device or client machine refers to the actual hardware (like a laptop, desktop, or tablet) that users use to access and interact with virtual desktops hosted on Azure. This device connects to Azure resources over the internet or a private network.
Private Network- A private network is a secure, internal network that restricts access to authorized users and keeps data traffic isolated from the public internet.
Site-to-Site connection- A Site-to-Site connection is a network configuration that securely links two distinct physical locations or networks, such as an on-premises network and a cloud network, over the internet or private links.
ExpressRoute- ExpressRoute is a service that provides a private, dedicated connection between an on-premises network and Microsoft Azure, bypassing the public internet for enhanced security and reliability.
2. Understanding Azure Virtual Desktop network connectivity:

1. The user uses a web browser or RDClient to connect to the Azure Virtual Desktop Workspace and clicks "Subscribe."
2. Upon clicking "Subscribe," the user enters their username and password. Once Microsoft Entra validates the user, it generates a token and returns it to the Client.
3. Client passes the token to the Azure Virtual Desktop (AVD) feed subscription service in the AVD Control Plane. The complete AVD Control Plane is managed by Microsoft. As a Customer we do not have any control over it.
4. The feed service validates the token with the Azure Virtual Desktop broker (RDBroker). Based on the token's information, the RDBroker retrieves the list of desktops and applications available to the user.
5. Azure Virtual Desktop feed subscription service passes the list of available session hosts and remote apps back to the client in the form of digitally signed connection configuration. Client stores the connection configuration for each available resource in a set of .rdp files.
6. When a user chooses a session desktop or remote app, the client uses the .rdp file to set up a secure TLS 1.2 connection to the RDGateway through Azure Front Door. Azure evaluates the latency of all gateways, grouping them by 10 ms, and selects the gateway with the lowest latency and fewest connections. Azure Virtual Desktop (AVD) has global points of presence (POPs) in various regions to keep connections fast and reliable, with Azure Front Door managing these locations to ensure minimal latency for users.
7. RDGateway validates the request and asks the RDBroker to orchestrate the connection.
8. Azure Virtual Desktop broker identifies the session host.
9. Remote Desktop stack initiates a TLS 1.2 connection to the same Azure Virtual Desktop gateway instance as used by the client.
10. After both client and session host connected to the gateway, the gateway starts relaying the data between both endpoints. This connection establishes the base reverse connect transport for the RDP connection through a nested tunnel, using the mutually agreed TLS version supported and enabled between the client and session host, up to TLS 1.3.
3. Three Workflows where we are going to use Private Endpoints:
1. Initial Feed Discovery: This is the traffic that flows from the client to the RDGateway and from the RDGateway to the RDBroker. The RDBroker retrieves the list of desktops and applications available to the user and sends it back through the same route to the client. This is the initial feed discovery.
After clicking on Subscribe and entering the credentials, it tries to find the resources associated with the requested feed. This is Initial Feed Discovery.

**Points 3 and 4 in the Network Connectivity Diagram is the Initial Feed Discovery Process**
2. Feed Download: When the client receives the list of resources from the RDBroker via the RDGateway, it downloads the configuration files for the available resources. This process is called Feed Download.
Once after finding the resources, the Workspace is available to the user with the Session Desktop or Remote App. This is Feed Download.

**Point 5 is the Feed Download Process**
3. Connections to host pools: When the user clicks on the Session Desktop icon, it initiates the remote connection and the the traffic goes to the RDGateway.

**Point 6 is the Connection to Host Pool Process**
4. Use cases:
1. All parts of the connection - initial feed discovery, feed download, and remote session connections for clients and session hosts - use private routes. You need the below private endpoints:

2. Feed download and remote session connections for clients and session hosts use private routes, but initial feed discovery uses public routes. You need the below private endpoints:

3. Only remote session connections for clients and session hosts use private routes, but initial feed discovery and feed download use public routes. You need the below private endpoint:

5. Best Practices:
1. You should create a separate workspace that is only used for initial feed discovery and doesn't have any application groups registered to it.
2. Create a dedicated subnet in the Hub Vnet for the private endpoints. If in case Azure WAN is being used in the environment, create a dedicated subnet in the Spoke Vnet for the private endpoints.
3. Use Static IP allocation for private endpoints if you need a stable and predictable IP address for consistent network management and security.
4. The dedicated subnet used for Private Link should have sufficient IP addresses. If you select static IP allocation for Private Endpoints, each host pool (4 IPs) plus each workspace (2 IPs) will require a total of 6 IPs per setup.
5. Implement and make use of Azure Private DNS zones for DNS resolution, ensuring that service names resolve correctly to the Private Endpoint's private IP address.
6. Create Private Endpoint for Host Pool (Connection):
1. Select the required Host pool, go to Settings->Networking->Public Access->Select Disable public access and user Private Access. Click on Save.

2. Select the required Host pool, go to Settings->Networking->Private endpoint connections->click on +New Private Endpoint.

3. Select the desired Subscription and the Resource Group.
Give the name for the instance.
Network Interface Name gets auto populated.
Select the Region
Click Next.

4. In the Target sub resource, connection gets auto populated. Click Next.

5. Select the Virtual Network and the Subnet.
Go with Statically allocate IP address.
Give the Name and Private IP address against each Member name. These IP addresses should be from the Subnet you provided.
Click Next.


7. Give the tags. Click Next. Click Review + Create and then Create.

7. Create Private Endpoint for Workspace (Feed Download):
1. Search for Workspace in the Global Search, select the required Workspace. Go to Settings->Networking->Public Access->Select Disable public access and use Private Access. Click Save.


3. Select the desired Subscription and the Resource Group.
Give the name for the instance.
Network Interface Name gets auto populated.
Select the Region
Click Next


Go with Statically allocate IP address
Click Next.

6. Select Yes to Integrate with Private DNS Zone. Click Next.

8. Create Private Endpoint for Workspace (Initial feed discovery):
1. You should create a separate workspace that is only used for this purpose and doesn't have any application groups registered to it. Deleting this workspace will cause all feed discovery processes to stop working.
2. Search for Workspace in the Global Search, select the required Workspace created for Initial Feed Discovery purpose only. Go to Settings->Networking->Public Access->Select Disable public access and use Private Access. Click Save.

3. Go to Workspace, select the required Workspace. Go to Settings->Networking->Private endpoint connections-> + New private endpoint.

Give the name for the instance.
Network Interface Name gets auto populated.
Select the Region
Click Next


6. Select the Virtual Network and the Subnet. 7. Select Yes to Integrate with Private DNS Zone. Click Next.
Go for Statically allocate IP address
Click Next.


8. Give the tags. Click Next. Click Review + Create and then Create.
9. Please restart all the Sessions Hosts whenever there is any change made to the network settings.
10. Once the Azure Private Link for AVD is successfully implemented, the user will get the below mentioned screen if he is trying to access AVD from public internet:

9. Troubleshooting:
1. After enabling Private Endpoint for the host pool, the health state of the Session Hosts shows as Shutdown:

Solution: Make sure the Firewall and Network Security Group is not blocking the traffic between your dedicated subnet that was created for the Private Endpoint and the addresses in the required URL list for AVD.
- You can add the application rule in the Firewall as shown below. Add the Dedicated Subnet in the Source IP.

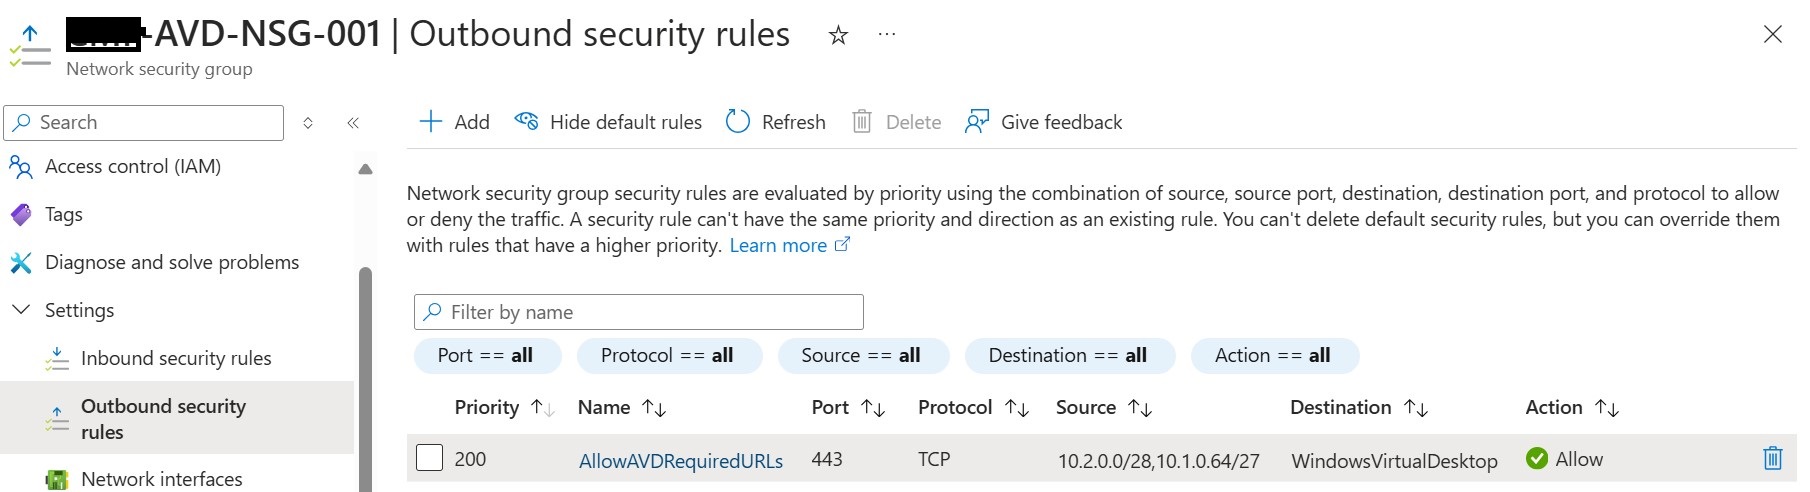
- For Network Security Group, add the Outbound Security Rule as shown below: